Having said that, I can't remember the last time I have actually bought a cookbook. Most of the time I look at the pictures and flip through the recipes and that is enough. I see a couple of ideas I like, some things I would like to try, but I rarely feel compelled to buy the book.
Well, that pattern changed for me a couple of weeks ago when I picked up a copy of Artisan Bread in 5 Minutes a Day
I have to say this book is a revelation. The thing about bread making for most home cooks is that it is such a dauntingly long and labourious process that most are either intimidated by the process or can’t be bothered to invest the time it takes just to get one loaf. This book absolutely changes that. It makes bread making accessible, easy and completely worth the effort.
As many of you have already gleaned from my earlier posts I am a big proponent of making things at home and avoiding processed food as much as possible. I think it is better for our bodies, better for the environment, and better for the family unit as a whole to be exposed to and involved in the process of getting fresh and real food to the table.
Every recipe turns out a perfect example of the desired bread and the process is equally easy for all. Best of all each loaf costs a fraction of what you would pay in the store. My only consistent change is to reduce the salt content in each recipe as I found the finished loaves a little too salty. Bottom line, I am so glad I came across this book.
Challah
adapted from Artisan Bread in Five Minutes a Day
1 3/4 cups lukewarm water
1 1/2 tablespoons granulated yeast (2 packets)
1 1/4 tablespoons salt
4 large eggs, lightly beaten
1/2 cup liquid honey
1/2 cup butter, melted
7 cups unbleached all-purpose flour
Egg wash
1 egg beaten
1 tablespoon of water
Poppy or sesame seeds (optional)
Part One: Making the dough
Mix the yeast, salt, eggs, honey, and melted butter with the water in a large bowl or food container. The dough will stay in whatever vessel you use to mix it in, so make sure it is large enough to store the risen dough but small enough to fit comfortably in your refrigerator.
Using a wooden spoon, mix in the flour. The flour must be completely incorporated so you can use an electric stand mixer if you have one with a big enough bowl. Other wise, stir until the flour is completely combined to create a sticky loose dough. You can use wet hands to incorporate the last of the dough if you need to.
Cover your container and allow the dough to rest at room temperature until it rises and and falls back a bit, or becomes flat on top. Make sure when you cover the container that you leave it open a bit to let the gas created by the rising process to escape. I cover my bowl with clingwrap and leave a little crack loose on one side. The rising process will take about 2 hours.
Once the dough has risen it can be used right away or can be placed in the refrigerator for future use. Due to the eggs in the recipe is should be used within 4 days. If you can not use it in that time, cut the dough into one pound pieces, about the size of a grapefruit, and freeze them in freezer safe bags for up to 4 weeks. Remove as much air as possible from the bag before placing in the freezer and defrost in the refrigerator overnight when you want to use one.
Part Two: Baking
Grease a cookie sheet or line it with parchment paper or a silicone mat. Position an oven rack to the centre of your oven. Lightly dust the surface of the dough in your container with flour and pull off a 1-pound piece. Using a little more flour on your hands, quickly shape the piece into a ball by stretching the surface of the dough around to the bottom.
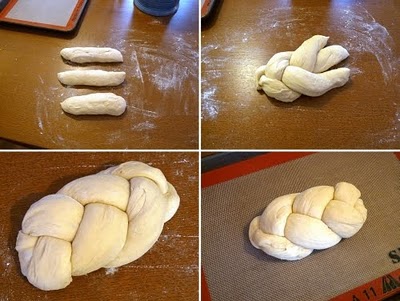
Divide the ball into three pieces and roll the pieces into a thin rope shape about 6-7 inches long. If the dough is hard to work with let it rest for 5 minutes and begin rolling again until you get the desired shape. Begin braiding the dough, starting at the centre and working your way out in one direction and then repeat the process on the other side. This will give your loaf a uniform thickness.
Move the prepared loaf to your cookie sheet and allow it to rest for 1 hour and 20 minutes(or just 40 minutes if you're using fresh, unrefrigerated dough). The loaf will rise again during this time.
Preheat your oven to 350-degrees about 15-20 minutes before it is time to bake. Adjust the time in accordance with how long it takes your oven to heat up. Brush the loaf with egg wash and sprinkle with poppy or sesame seeds, if you are using them.
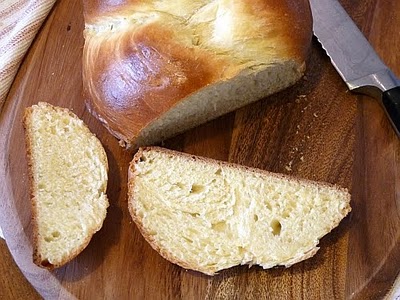
Bake for 25 minutes or until your Challah is golden brown and springs back when lightly touched at the centre. The loaf should offer resistence when you press down lightly between the braids. Remove from the oven and place on a baking rack to cool before eating.


That challah looks amazing and reminds me I should really try making my own!
ReplyDeleteThese recipes are amazing. If you have a smaller family or want to mix in your KitchenAid the recipes are easily cut in half and you STILL have two loaves of your favorite bread. Yours, by the way, looks stupendous.
ReplyDeleteBeautiful pictures!
ReplyDeleteI also adore the Artisan Bread in 5 book! And Challah is my favorite recipe from there so far:
http://cookingrookie.blogspot.com/2010/01/challah-in-5-minutes-day.html
What a beautiful, beautiful bread. You did a fabulous job.
ReplyDeleteAllison your challah looks amazing. I've tasted your cinnamon buns too and they are out of this world.
ReplyDeleteThank you. This is my new favourite bread. I made Cinnamon Buns with some of the dough and they were great too!
ReplyDeleteI made challah recently myself and I loved whole process of making, baking and then of course....eating...it was so good. There is nothing like homemade bread. Yours looks amazing!
ReplyDeleteI saw your post M. and it looked great. Reminds me I should try this with raisins.
ReplyDeleteWhat a lovely loaf! Great tutorial!!
ReplyDelete:)
ButterYum
You're up at Foodwhirl today :)
ReplyDeletehttp://foodwhirl.com/spotlight/spotlight-make-challah-bread
Hi Allison I made this recipe, loved it and have now bought the book. Great stuff, thanks.
ReplyDeleteRose, Thank you for your lovely comment. I am so glad the recipe worked out for you and I hope you enjoy the book as much as I do!
ReplyDeleteWow... that's very pretty bread. :) I have a pretty good challah recipe, but I'm thinking on trying a new one, since I haven't in a while. Found you off of Dessertstalking.com btw. :) thanks for submitting so I could find your blog.
ReplyDeleteblessings!